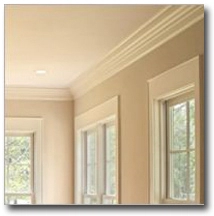
Crown Molding Installation: DIY Guide & Tips

Crown molding adds visual interest to a room. It can create character where none existed before and even make low ceilings appear higher. In terms of enhancing the architectural style of your home's interior, crown molding also comes in as one of the less-expensive options. It does not, however, qualify as an easy-to-accomplish task for DIYers. Learn what this home improvement project involves before deciding whether to go it alone or hire a professional handyman to help.
Choosing the Right Crown Molding
Not only must you decide on a crown molding that complements the existing style of your home, but you also must choose a material. At the top end of the range is wood, with medium-density fibreboard costing less. MDF should not be used in every type of room, though, because it can warp. A professional can help you pick both a style and material that will age gracefully along with your home.
Measuring and Cutting the Crown Molding
If you do not have professional-level carpentry skills, accomplishing this task correctly can significantly and unnecessarily increase the total cost of the project. Measurements must be exact, with each piece planned out in terms of how it will fit with the next. If you measure incorrectly, you may end up with a strip too short and good only for scrap, forcing you to start again with a new piece of crown molding. Cutting the crown molding itself also proves challenging for amateur carpenters, as sloppy cuts can create unsightly gaps. This project also requires specialty tools such as a coping saw and power miter saw, in addition to a chalk line, hot-glue gun, rasp, drill, and hammer.
Attaching the Crown Molding
You will need a partner for this phase of the project, someone to handpieces up to you and hold them in place while you attach the crown molding to the wall. You also must be precise with fitting, and keep in mind that you can hide minor mistakes with caulk on paintable material, you cannot with stained crown molding. Going through and making up for imperfections in cutting and attachment also can significantly and unnecessarily increase the total time this project takes.
Deciding Between DIY vs. Professional Installation
Keeping all of the above in mind, whether or not you can do this project yourself depends on your carpentry skills and experience. If you have never before worked with wood pieces that require precise measurement and planning to fit together, this task probably proves out of your reach if you want professional-looking results. Those with mid-level skills in this area still may want to hire help, as this type of project can take much longer than expected; estimates put installation at eight hours per room. Keep in mind the type of crown molding chosen when deciding between DIY and professional installation. The fancier the crown molding, in terms of design and finish, the more slight imperfections will show. If you plan to opt for more expensive materials, why would you cut costs on installation and diminish their appearance in the overall results of the rooms?
Increasing the Value of Your Home
When considering the benefits of adding crown molding to your home, add to the list increasing the value of your home in the event of a resale. That said, such an increase comes with correctly installed crown molding. In fact, an empty space at the top of your ceilings will have far more value to potential homebuyers than shoddily placed pieces, as they will likely factor in the cost of replacing the crown molding when making an offer on your home.
This article is part of the Crown Molding Installation series. Read more for more molding and trim ideas and tips from Mr. Handyman.
Mr. Handyman can maintain your home to save you money. One call really does take care of everything on your to-do list. Make sure to stay on top of all your household repairs, improvements, and maintenance needs and request service now online.
 Click to call


