 Click to call

Ask Mr. Handyman: Best Way to Repair Small Holes in Walls
QUESTION TO MR. HANDYMAN
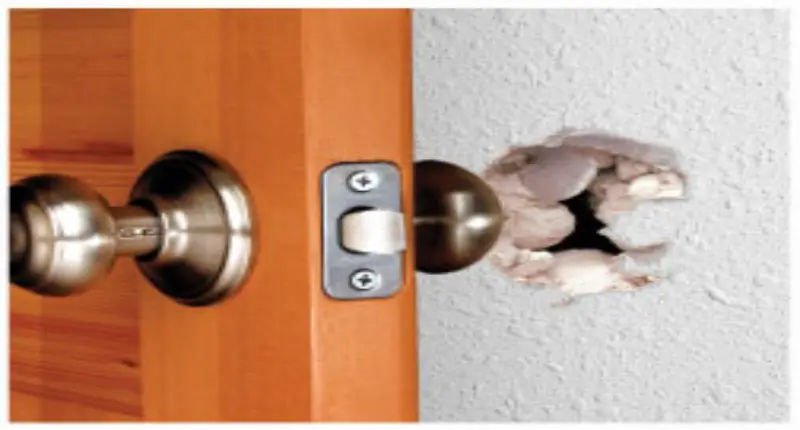
Dear Mr. Handyman, what is the best way to repair small holes and/or nail loosening in walls? We have some holes made by door knobs that have become larger with time. I also have noticed that nails are coming out when I push on the wall in certain places.
Thanks, Marci S.
![]()
Dear Marci, let’s begin at the end. The nails starting to protrude from the sheetrock happens due to the wood studs expanding and contracting. This change is caused by periods of moist and dry times within the house. Moisture swells the wood, thus forcing the nail out. The wood dries, and shrinks, but the nail stays out. Over time the sheetrock around the area becomes loose.
The best fix for this is to replace the nasty nails with sheetrock screws. In most cases, you would not need to remove the nail. Add a screw about an inch or two above and below the nail. With a hammer slightly dent the old nail area, try not to break the sheetrock paper, you will fill this and the new screw(s) with taping compound.
Holes in the wall are a bit more involved. For any hole, smaller than two inches or so, fiberglass sheetrock tape and some compound may suffice. For wall holes that are larger, a piece of sheetrock will be used as a plug. Make sure the piece of sheetrock is the same thickness as the wall being worked on. Houses are generally half an inch, however, walls that share a garage maybe five or eights inch. This thicker material is for fire code.
A square or rectangular hole is easiest to work with, so we will cut out the hole to this shape. You can use a piece of cardboard to trace this around the hole. Make it small, but still cover the hole. But now I will have a bigger hole in the wall! Yes, but it’s better to work with. You will need a piece of sheetrock, some wood, 3 or 4 inches wide, and a sheetrock saw or utility knife, screw gun, a paintbrush and the wood—one-inch pine will do fine.
Cut out the marked area, using the sheetrock saw or a utility knife. Watch those fingers! Now you have to cut a piece of sheetrock to the size of the hole you just cut in the wall. Don’t worry about fitting it like a glove, taping will handle that.
We’ll need to cut the pine next. Cut the wood, lengthwise, about four inches longer than the cut-out hole. With a screw-gun and a screw ready slip the wood inside the wall firmly up against the back of the sheetrock. Center it and screw it in by putting the screw in the wall one inch from the cut edge of the outer wall. Screw in both ends this way. In some cases, you may need two boards, one on each upper and lower cut-out edge. Place the sheetrock plug you cut earlier inside and against the pine and screw this in also. Wasn’t that easy? Now comes the hard part, taping. If you never tapped before you should consider having a professional handle this part.
If Michelangelo—the artist—were alive today, and he wrote a “How to Paint” book, most people would never paint as well as he did. This is the same for taping. Good taping is an art. The finished product is what you see. A good taper will have a flat unblemished wall that will need a very little sanding and have very little mess. The problem with taping is that the bad stuff won’t show up until after the wall has been painted and that’s a lot more work in the end to fix it.
If you have a lot of holes and nails to tape, I recommend having a professional do the work. At Mr. Handyman, we have professionals ready to fix your walls, ceilings, and floors too.
Mr. Handyman technicians hold years of experience dealing with problems like this. If you feel unsure about being a do-it-yourself person, just give us a call and our experienced techs will be able to help you with this and any other jobs you wish to have done. No job is too small. You can also take comfort knowing that the work will be, “DONE RIGHT,” with 100 percent satisfaction guaranteed.