Last Edited: 4/11/24
Mr. Handyman shares how to create a DIY toad house for your garden.
|
DIY Toad House: Make the Perfect Toad Abode
Toads are a great addition to any garden – and not just the decorative variety! Live toads eat pesky pests, they are environmental indicators, and they’re so cute! Toads are most active in the evening because their skin can dry out in heat and sun, but they can be seen during the day too. Now you can offer them a cool, dry place to call home in the comfort of your own garden.
This is the perfect project for anyone who loves crafts and gardening, as well as a great project to do with kids on dreary spring days.
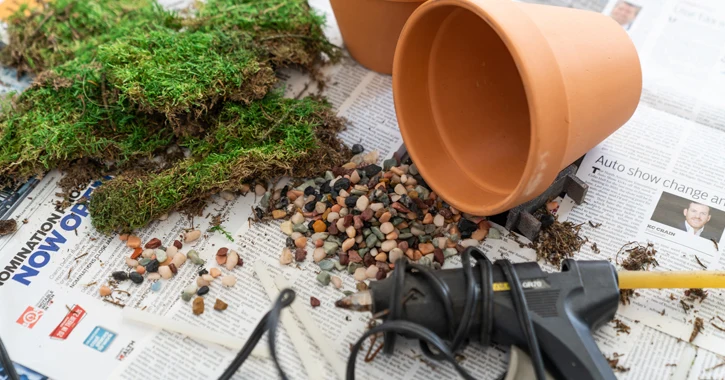
DIY Toad House Supplies
While just about anything can be repurposed into a toad house – it just needs to provide a bit of shelter – terra-cotta flowerpots are a popular option. A terra-cotta saucer is another great choice.
Once you have your pots, it's time to scrounge up some décor. You can look in your backyard or set off on a more ambitious hike. Collect stones, acorns, moss, shells, and anything else you think would make nice siding and roofing. If the toads around your house are a little more glamorous, bust out the glitter, sequins, and whatever else you have among your craft supplies. You’ll also need:
- A hot glue gun
- Glue sticks
- A Dremel tool, sandpaper, or a metal file
How to Build a DIY Toad House
- Start by chipping out a doorway or entrance in the rim of the flower pot. Terra-cotta is brittle, so take care in this step.
- Use a Dremel tool, sandpaper, or a file to shape the doorway to your liking.
- Accent the entryway by gluing a bit of rope or other decorative touches along the arch.
- Spread out your decorations so you can see all your choices as you begin to attach them to the outside of the pot with the glue gun. (If you’re crafting with kids, maybe the hot glue gun should be operated by an adult).
- Glue on your décor to suit the taste of the toads in your garden or yard.
- If desired, you can grout between the decorative pieces with sand grout, which comes in different colors. Follow the manufacturer’s instructions for this step.
- Once the glue (and any grout) dries, find a shady, cool, up-and-coming area of the garden where you can place the toad house. Bury the rim in the soil to stabilize it.
- A flowerpot saucer can be used as the roof of a “lean-to” type shelter, propped up by larger rocks, or as a roof for your flowerpot house. You can add soil and moss to the top or pile up other trinkets and treasures using the hot glue gun.
- Now you’re ready for your new tenants!
Not a Crafter?
If a hot glue gun sounds messy – or terrifying – or maybe you like a less whimsical aesthetic, you can always opt for a more natural-looking habitat. A quick and easy version of the toad house involves only (gently) cracking in a doorway and placing the structure in your garden. A moss-covered saucer roof is an easy, natural addition.
Other Considerations
- Avoid using pesticides in your garden. They may help with problem pests, but they can poison other animals that ingest them – like our toad friends.
- Get your backyard certified as a wildlife habitat! When you incorporate the needs of local wildlife into your yard, the National Wildlife Federation may officially certify it. Please visit their website for more information.
Professional Home Improvement – Indoors and Outdoors
If you need help cultivating a habitat in your backyard, contact your local Mr. Handyman. From routine maintenance to extekrior home improvement projects, Mr. Handyman can help get your yard in shape for entertaining – whether your guests are friends, family, or toads. Call or request an estimate online.
