Mr. Handyman explains how to install window trim for a polished finish.
|
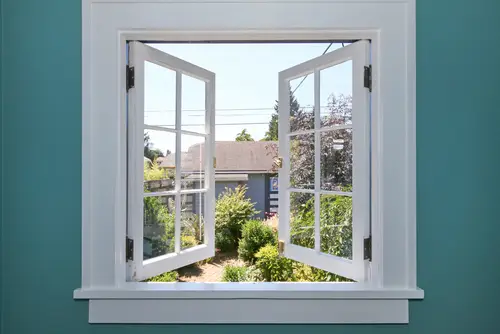
Window trim might seem like a small detail, but it’s one of those finishing touches that brings a room together. Whether you’re replacing old trim or installing it for the first time, we’ll walk you through the tools and tricks to get clean corners, tight joints, and a pro-level finish.
What to Know Before Installing Window Trim
Installing window trim isn’t overly technical, but it does take a bit of finesse. As with any home improvement project, a little prep work can go a long way. Here’s what to know before you start cutting boards and firing up the brad nailer:
- Measure and mark reveal lines. Use a pencil, rafter square, and straight edge to draw a line along each side of the jamb, 3/16" from the inside edge. These lines, called “reveals,” provide a reference to guide your cuts for each piece of trim. This method is more precise than measuring each board, especially on older or uneven frames.
- Seal gaps before you trim. If your window frame isn’t level or has small gaps, you may need to use shims to adjust the fit before filling it with foam insulation or caulk. Let everything dry and remove any excess before adding trim.
- Start big. If you’re trimming multiple windows, begin with the largest. You can often reuse any miscuts on smaller windows.
- Trim boards are long and awkward. Cut them to a rough size before dialing in miter angles. This makes handling easier and helps you avoid mistakes.
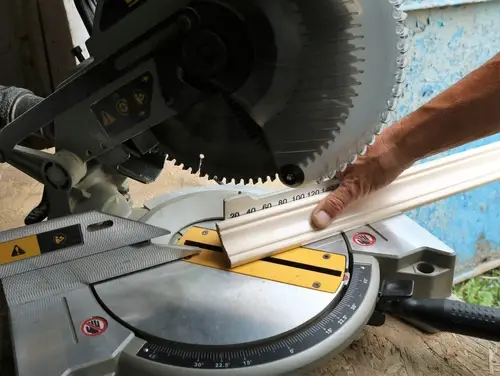
- Expect imperfect angles. Most window corners aren’t exactly 45 degrees. You’ll likely need to adjust your miter cuts gradually—“sneaking up” on a perfect fit.
Whether you’re handling the tools yourself or just want to understand the process before calling in backup, these simple steps will make the whole project feel smoother and help ensure a professional look for your finished trim.
Tools and Materials You’ll Need for Installing Window Trim
The right tools make installing window trim easier, cleaner, and faster. Whether you’re adding trim to one window or updating several, here’s what you’ll need for smooth cuts and tight joints.
Full Setup for Clean, Professional Results
This is the standard setup for installing window trim:
- Miter saw: For cutting sharp angles on window trim boards
- Brad nailer with air compressor: Helps secure the trim quickly and cleanly
- 1" and 2¼" brad nails: Use 1" nails for attaching to the jamb and 2¼" nails for securing the trim to the frame or drywall
- Wood glue: Strengthens the miter joints at each window corner
- Rafter square: Helps mark reveal lines and keep everything square
- Pencil: For reveal marks and cut measurements
- Trim boards: Choose pre-primed wood or stain-grade trim depending on your finish
Minimal Setup for Single Window Projects
If you’re trimming just one window and don’t have power tools, this alternative setup can still get the job done:
- Miter box and hand saw: Requires careful cutting and patience
- Finish hammer and nail set: For driving and hiding finish nails
- Finish nails: Combine with glue for a strong, lasting hold
Step-by-Step: How to Install Window Trim
With your tools ready and trim prepped, it’s time to get hands-on. Installing window trim follows a simple sequence: top, sides, then bottom. Go slow, check your cuts, and use your reveal marks to keep everything clean and even.
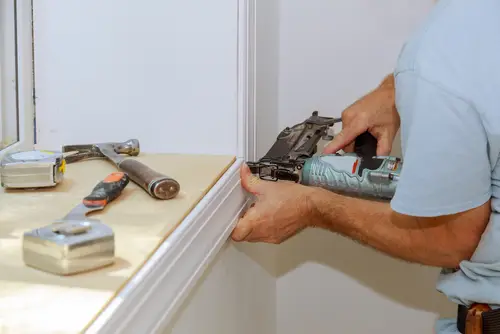
Step 1: Install the Top Trim
The top piece provides a guide for the sides and bottom.
- Cut one end of the top trim board at a 45-degree angle. Place the thick edge against the miter saw fence for the smoothest cut.
- Align the angled end with your reveal mark at the top-left corner of the window.
- Hold the trim in place and mark the opposite end. Cut it at a matching 45-degree angle (remember to flip the board).
- Apply wood glue to the miter corner if desired.
- Nail the trim to the window frame using 1" brad nails for the jamb and 2 ¼" nails for the wall. Space them about 6 inches apart.
Handy Tip: Don’t nail closer than 2 inches from the trim’s edge to prevent splitting.
Step 2: Attach the Side Trim
Precise side piece alignment will help your window look square and professionally finished.
- Cut one end at a 45-degree angle to match the top miter.
- Test the fit. If it’s not tight, adjust your cut slightly—this is where the “sneak up” technique comes in handy.
- Once the top joint fits, mark and cut the bottom end to follow your reveal line.
- Add wood glue to the corner joint before nailing it in place.
- Repeat on the other side.
Step 3: Cut and Install the Bottom Trim Board
The bottom trim board can be the trickiest—it has two miter joints that need to fit perfectly.
- Cut one end at 45 degrees and test-fit against the side trim.
- Do the same on the opposite end, but wait to cut to length.
- Once both miters fit snugly, mark the length and make your final cut.
- Secure the trim with glue and brad nails.
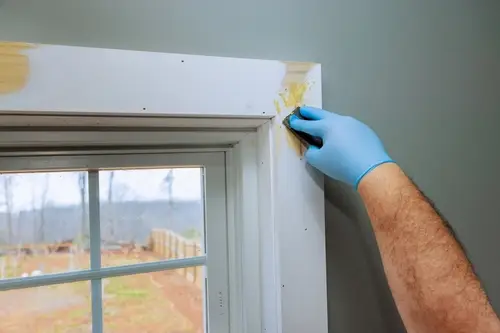
Step 4: Finish with Caulk and Putty
Finishing details are what make your window trim look sharp.
- Use wood putty to cover nail holes (match your paint or stain).
- Apply a thin bead of paintable caulk where the trim meets the wall to hide any gaps. Be sure to avoid caulking in the wrong places around windows to prevent moisture issues or paint cracking.
- Let everything dry before painting your window trim or applying stain for a polished finish.
How to Install Window Trim Like a Pro: Tips for Clean Joints
Once your trim boards are in place, the difference between an amateur job and a professional window trim installation comes down to the details. Tight joints, clean edges, and even reveals? That’s the goal—and here’s how to get there.
- Sneak up on each miter cut. Don’t aim straight for your pencil mark. Instead, shave off small amounts and test the fit between each cut. Most window corners aren’t a perfect 45 degrees, especially in older homes.
- Use wood glue at every corner joint. A dab of glue holds miter joints tight and reduces the risk of gaps forming over time.
- Lightly sand edges before caulking. Sanding helps paint or stain go on evenly while smoothing any rough cuts.
- Caulk is your cleanup crew. A fine bead of paintable caulk hides tiny gaps and creates a seamless transition between trim and wall.
- Watch your reveal and level as you go. A consistent 3/16" reveal gives your trim a polished, intentional look. Use a small rafter square to check alignment as you install each piece.
These finishing tips can help you save time and avoid frustration while making your window trim appear custom-built. Clean miter joints and smooth corners don’t just look better—they help the whole project hold up longer.
Common Mistakes to Avoid When Installing Window Trim
Window trim might seem straightforward, but the small stuff? That’s where things can go sideways. Here are a few common missteps and how to steer clear of them.
- Don’t assume every corner is a perfect 45 degrees. Most window corners aren’t exact. Walls shift, frames settle, and drywall adds slight variations. Always test-fit your miter cuts and adjust gradually—a technique pros call “sneaking up” on the angle.
- Avoid nailing trim too close to the edge. Brad nails placed too close to the end of a trim board can cause it to split. Keep your nails at least 2 inches from the edge, and alternate nail lengths to secure trim to both the jamb and the drywall.
- Remember to glue miter joints. Miter joints may look snug at first, but without wood glue, they’re more likely to separate over time. A small dab of glue before nailing helps the corners stay tight and clean.
- Leave no gaps unfilled. Even with tight cuts, small gaps are common where trim meets the wall. Use a paintable caulk to seal edges and wood putty to cover nail holes. This step makes a huge difference in the final look.
- Don’t rely on measurements alone. A measuring tape can get you close to the perfect cut, but dry fits and reveal marks offer better accuracy. Because window frames are often imperfect, trim boards should be cut based on feel and fit, not just measurements.
These mistakes are easy to make, but also easy to avoid with the right prep and technique. And if you’d rather skip the learning curve, your local Mr. Handyman® team is always here to help.
When to Hire a Pro
DIY trim installation can make sense if you’ve got the tools, time, and only a few windows to tackle. But if you’re after that clean, finished look—with less trial and error—hiring a pro may be the smarter call.
Here are some situations in which hiring a professional makes more sense:
- You don’t have the tools or time. Trim installation looks simple, but getting tight miter joints and clean reveals takes practice and patience.
- You want it done fast. A pro can trim a window in under an hour.
- You’re already hiring someone. If you’ve got other repairs or upgrades planned, you may be able to save time and money by folding trim work into the job.
Whether you’re trimming one window or updating every room, clean corners and tight joints can take time and practice. If you’d rather leave it to the pros, we’re ready to help.
Mr. Handyman service professionals arrive on time, in uniform, and get the job done right. Contact your local Mr. Handyman® team to learn more about our services and schedule an appointment.
This article is intended for general informational purposes only and may not be applicable to every situation. You are responsible for determining the proper course of action for your home and property. Mr. Handyman is not responsible for any damages that occur as a result of this blog content or your actions. For the most accurate guidance, contact your local Mr. Handyman location for a comprehensive, on-site assessment.
FAQs About Installing Window Trim
Mr. Handyman has been helping homeowners and businesses repair, maintain, and enhance their spaces for over 25 years! We are the one-stop solution for everything on your to-do list. This includes answering your questions about home repairs, maintenance, and improvements. Here are answers to some of your most frequently asked questions on installing window trim.
What’s the easiest way to install window trim?
The easiest way to install window trim is to measure reveal lines, cut trim boards with a miter saw, and attach them using wood glue and brad nails. Start with the top piece, then install the side and bottom trim. Using pre-primed trim and caulk simplifies the process.
Do I need a miter saw to install window trim?
You don’t need a miter saw to install window trim, but it makes angled cuts faster and more accurate. A miter box and hand saw can work for small projects, but a miter saw is ideal for clean, professional-looking joints, especially if you're trimming multiple windows.
Can I install window trim myself?
Yes, installing window trim is a common DIY project for homeowners with basic tools and patience. You'll need to cut trim boards, make angled miter joints, and use brad nails and caulk for a clean finish. It takes a steady hand, but DIY window trim can look professional with the right prep.
What kind of trim is best for windows?
Pre-primed wood trim boards are a popular choice for installing interior window trim. They’re easy to cut, paint, and finish. For a custom look, decorative casing or layered trim styles work well. Make sure the boards are straight and dry for a smoother window trim installation process.
How long does installing window trim take?
Most professionals can install window trim in under an hour per window. DIYers may take longer, especially when learning how to measure reveals, cut miters, and handle caulking. Plan for 1–2 hours per window if it’s your first time.
