Mr. Handyman explains how to protect wood posts in the ground to prevent rot and extend their lifespan.
|
Wood fence posts will rot due to prolonged exposure to moisture in the soil. This article will teach you how to prevent fence posts from rotting, which will save you time and money in the long run because once a fence post starts deteriorating, you have no other option but to get rid of it and sink a new post.
Choose Your Lumber Wisely
No matter which lumber you choose, make sure it’s been pressure-treated. This wood looks “green” and is sometimes called “Wolmanized®.” (This means it’s treated with chromated copper arsenate, a preservative.) If not pre-treated, the posts will be more susceptible to rotting.
Alternative options to pressure-treated lumber are:
- Western red cedar – naturally rot-resistant wood with a long lifespan.
- White cedar or black locust – prevents the growth of fungi (suitable for marshy environments).
- Cypress or redwood – naturally water-resistant.
Why Use Treated Wooden Posts
Softwood posts in the ground that are not treated may only last up to 6 months! Using treated posts will ensure longevity.
Some fence builders will wrap the base of the post in sheet copper or galvanized steel to prolong the wood's life even further, but the consensus is that treated posts will do the trick.
Can You Treat Wood Yourself?
For wood post projects, you should always buy lumber that has been pre-treated. Treating the wood yourself doesn’t always have the same results, since the preservative can’t penetrate the wood as far.
However, if you want to treat the post yourself, brush the bottom half with a wood preservative such as waterborne copper naphthenate following the manufacturer’s instructions. You should also use the same treatment technique for any treated lumber that is cut with a saw and that leaves an untreated section exposed to the elements.
Farmers and old-timers swear by the “charring” method of wood preservation. This technique is only safe for untreated lumber since it lightly burns the wood. Use a torch or a campfire to “char” the part of the wood that will be buried or in contact with the ground. As always, take precautions when burning wood and keep water nearby to extinguish any flames.
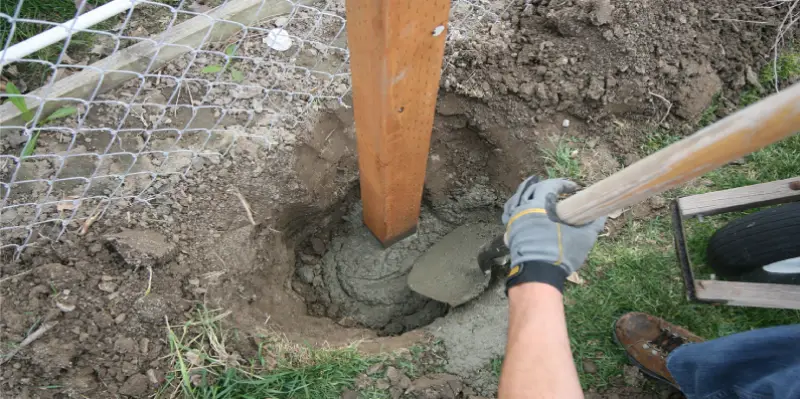
Set in Gravel and Concrete
Once the posts are treated, it’s time to set them in the ground. You’ll want to dig a hole about twice the diameter of the fence post and as deep as your frost line – which can be as shallow as 16 inches to as deep as 42 inches – check with local building codes for this depth. Fill the first three inches up with gravel so the end of the post doesn’t come into contact with the dirt. Gravel allows water to drain quickly away from the post and into the soil.
Be sure to place the post in the center of the hole.
Finally, fill the entire hole up with cement to the top. Concrete will hold the fence firmly in place and prevent any lateral movement. For even more protection, dome the top of the concrete so it slopes away from the post to divert water away from the post.
Professional Fence Installation Services
If you’d like a fence that won’t rot, give Mr. Handyman a call or request service online. We will make sure your fence is constructed securely and built to last.
This article is intended for general guidance only and is not applicable to every situation. You are responsible for determining the proper course of action for your property and situation. Mr. Handyman is not responsible for any damages that occur as a result of advice and/or guidance derived from its blog content. Some Mr. Handyman services vary by location. Contact your local Mr. Handyman franchise for more information.
FAQs About Preventing Fence Posts From Rotting
For over 25 years, Mr. Handyman professionals have been helping homeowners and businesses repair, maintain, and enhance their space. We are a one-stop solution for everything on your to-do list. This includes answering your questions about home repairs, maintenance, and improvements. Here are answers to some of your most frequently asked questions about preventing fence posts from rotting.
How do you stop fence posts from rotting?
Many homeowners wonder how to stop fence posts from rotting. It comes down to choosing the right materials, installing them correctly, and protecting them from long-term moisture exposure. Use pressure-treated or rot-resistant wood, apply a preservative, and install posts with proper drainage to extend their lifespan.
- Choose rot-resistant wood:
- Use pressure-treated wood or naturally durable species like cedar or redwood.
- Look for posts labeled for “ground contact.”
- Apply protective treatments:
- Use a wood preservative, such as copper naphthenate, on the buried portion.
- Apply a water-repellent sealant, and consider staining or painting for surface protection.
- Install for drainage:
- Set posts in gravel for drainage, then pour concrete around (but not under) the post.
- Slope the concrete away from the post top to prevent pooling.
- Backfill with gravel and soil to help shed water and resist frost heave.
- Add protection:
- Use fence post treatments, Postsaver sleeves, or wraps to form a moisture barrier around the base.
- Ensure the post is dry before installation.
- Keep it maintained:
- Inspect regularly for soft spots, cracks, or discoloration.
- Remove debris, mulch, or vegetation from the base to promote airflow.
How do you make wood posts last longer?
To extend the life of your fence posts, follow these steps:
- Start with pressure-treated or rot-resistant wood.
- Use a fence post treatment before installation.
- Install in a way that prevents water buildup. Use gravel at the base and ensure any surrounding concrete slopes away from the post.
- Seal, stain, or paint regularly and keep the base free from moisture-trapping debris.
Should wood fence posts be set in concrete?
Yes—but only if you take the right steps toward protecting the wood post in concrete. One common mistake is encasing the entire post, which traps moisture. Instead, place gravel below the post to allow drainage, pour concrete around (not beneath) the post, and slope the surface away from the post. This method offers long-term stability while still protecting a wood post in concrete from rot.
How long will a treated 4x4 post last in the ground?
With proper installation and a solid fence post treatment, a pressure-treated 4x4 post can last 15 to 25 years. That lifespan depends on soil conditions, moisture exposure, and ongoing maintenance. Applying sealants, removing debris, and knowing how to stop fence posts from rotting all play a role in getting the most out of your fence.
What causes fence posts to rot quickly?
Poor drainage, untreated wood, and moisture buildup are the main causes of fence rot. Posts rot faster when concrete is poured without a gravel base, when moisture is trapped in surrounding mulch or grass, or when the installer skips fence post treatment.
In general, the keys to stopping fence posts from rotting are to keep water moving away, use the right materials, and stay on top of maintenance.
What is the best fence post treatment?
The most effective fence post treatment includes applying a wood preservative, such as copper naphthenate, on the buried portion of the post. Above ground, a water-repellent sealer or exterior-grade stain provides added moisture protection. To go a step further, use Postsaver sleeves or wraps for a physical barrier between the post and the soil. This is especially useful when protecting wood posts in concrete installations.
What is charring wood for ground contact, and does it work?
Charring wood for ground contact—a technique known as Shou Sugi Ban—involves lightly burning the wood surface to form a protective char layer. This layer repels moisture and deters pests naturally. While it can help improve longevity and repel water and pests naturally, it’s best used alongside modern methods like fence post treatment, gravel drainage, and other means of protecting wood posts in concrete installations. Think of it as bonus protection, not a replacement.
If you're curious about incorporating charred wood into your outdoor design—or just want to make sure your next fence or deck post installation is done right—find your local Mr. Handyman for expert fence and outdoor project support backed by 25+ years of trusted experience.
How do you repair a rotting wood post without replacing it?
Repairing a rotting fence might include digging out the post, applying a hardener, or filling holes with epoxy. However, these DIY repairs often miss hidden decay and may not hold up in the long run. If the post is load-bearing or is deeply damaged, replacing it with a proper installation is your best bet. A full replacement includes fence post treatment, gravel for drainage, and protecting wood posts in concrete to stop future rot.
