Mr. Handyman explains why caulking your trim is essential for home maintenance.
|
For many people, installing trim is as simple as lining it up and driving in a few nails, right? Not so fast. If you’re putting trim in your house, it’s important to know that perfectly flush trim is hard to achieve. Even flush trim will likely come loose from walls and windows over time, creating little gaps. Before painting over these gaps and crevices, caulking is a perfect way to make sure your finished project looks as good as the picture you had in your head. However, to get the job done right, you’ll want to learn the prep requirements and proper techniques first!
Tips for Caulking Trim
For the best results when caulking trim (or any other feature of your home), try these tips:
- Clean the caulk tube’s tip. With repeated use, the tube will get backed up. If you use a screw or nail to clean it up before using it, you’ll avoid uneven caulk lines.
- Use painter’s tape. Even though caulk can be easily cleaned up, you can save time by using painter’s tape. It will allow you to apply caulk where you want it without getting it in places you don’t.
- Check your caulk in a few different ways. First, check the type of caulk: There are different types for different jobs, and you’ll need interior trim caulk for the best results. Then check the tube to make sure you cut the tip off in a straight line at a 45-degree angle. Lastly, check the expiration date. Yes, caulk does expire. Luckily, it does last a while. It can take up to 20 years for most caulk to become unusable (meaning it won’t cure).
How to Apply Caulk to Trim
From the prep to the final step, here’s how an expert caulking process works:
- Clean the surface you’re going to caulk. Any loose debris like dust and dirt can lessen the seal.
- Get water and paper towels. Wet your hands, so caulk doesn’t adhere well to them. Then wet a paper towel (with extras nearby), so you can use it to wipe off excess caulk.
- Remove the tip of your caulk tube. Try to cut a straight line at a 45-degree angle. Make sure the cut is made about a quarter of an inch into the tube to make a full opening.
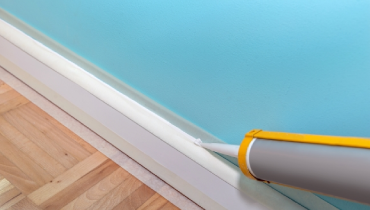
- Apply caulk to your trim. Hold the tube at a 45-degree angle to the gap at the edge of the trim, with the tip flat against that gap. Squeeze until the caulk starts flowing, and then move at an even pace to keep the caulk bead a consistent size. Use enough caulk to fill gaps and cover impurities, but avoid using too much, as this may just create new uneven areas.
- Smooth out your caulk. Once your caulk dries it will be hard to do anything with, so be sure to smooth it out with your finger before it dries to ensure a good-looking result.
- Clean up. Use the wet paper towel to take care of any excess caulk on the trim or wall surface. Cap your caulk tube so you can use it for future projects.
Frequently Asked Questions About Caulking Trim
Do I caulk before or after painting?
Yes, caulking trim before painting is usually best, as any imperfections will be filled in by caulk. Then, once painted, the surface should look perfect. Caulking your trim after painting is still possible, but you’ll need to use more caution to not damage your recently completed painting project. Use painter’s tape around where you’ll be caulking and take extra care to remove any excess or uneven caulk beading.
Do I need to caulk trim in my bathroom?
When installing trim in the bathroom, it’s ideal to caulk it. You can get away with not caulking in some less humid areas of your home, but in the bathroom or kitchen, that extra seal that caulk provides can help keep water from getting behind your trim and causing mold growth.
Do I need to caulk window trim?
To help reduce drafts and increase energy efficiency in your home, it’s a good idea to caulk your windows’ trim. However, there are several different types of caulks, including various interior and exterior products. Before starting, identify where you’re caulking and if you have the right materials for the project.
Related Topic: Where Not to Caulk Around Windows
Making Sure Your Caulking Is Applied Properly
Caulking your trim is not overly complicated, but it is a task that requires finesse and precision to get a smooth finish and ensure a proper seal. If you don’t have the time or patience to prepare and caulk properly, your local Mr. Handyman can help. Our service professionals are experts at caulking, carpentry, repairing and installing drywall, and helping you complete any other small projects around your home. And when you hire us to help around the house, you know the job will get done right, thanks to the Neighborly Done Right Promise. To learn more or to get started, give us a call or request service online today.
