Installing crown molding enhances a good interior design, whether it be on cabinets or in rooms. This guide offers advice and explains how to set up and maintain these elegant design features for your Palm Beach Gardens home.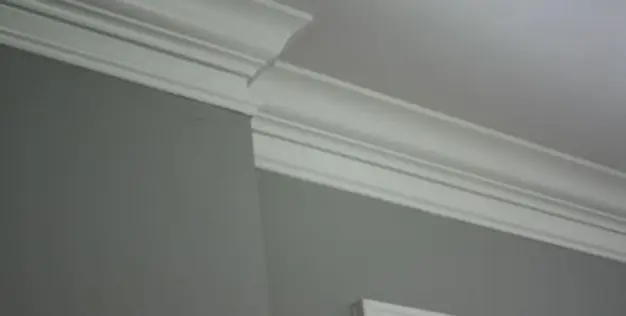
CROWN MOLDING INSTALLATION FOR A UNIQUE INTERIOR
Do you wish to give your interior spaces more style and architectural character? You can achieve this by installing crown moldings since they visually separate walls from ceilings, enhance cabinets, and obscure cracks. Mr. Handyman provides you with the best crown molding installation services in the industry, to best suit an individual liking. Are you residing in Palm Beach County, Florida and in need of crown molding installation? Contact Mr. Handyman today to get a free quotation.
CROWN MOLDING TECHNIQUES: TOOLS TO GET STARTED
The following materials are required for crown molding installation:
- Molding pieces
- Paintbrush
- Paint/varnish
- Miter saw
- Chalk or a pencil
- Caulk gun
- Bubble level
- Tape measure
- Ladder
- Caulk
- Scraper
- Masking tape
- Glue and sealant
To smooth any uneven surfaces, you might wish to add sandpaper to the list. When cutting the material, use gloves and safety eyewear for your own protection.
ROOM CROWN MOLDING INSTALLATION GUIDE
Crown molding installation is a fantastic technique to give the walls of your Palm Beach Gardens home depth and contrast. Your property develops elegance and value as a result.
- If you want to paint or varnish your crown molding, decide whether to do it before or after installation. Paint the pieces before hanging them if you believe it will be difficult to access all regions of the molding after installing crown molding. After installation, painting can assist conceal wall joints if your wall will have them in the center. To fix the crown molding and paint another layer over it later, you would want to use a primer and perhaps a first layer of finish first.
- The next step is to make a template so that you may mark the walls. You can use a corner you’ve created in the manner described here to check that the angles of your cuts are accurate. To ensure that your molding joins at the right angle, cut it using a miter saw. Then, use an adhesive to unite the pieces, and place them below the ceiling. Now you may make identical notes wherever you want to hang the crown molding and indicate where the molding’s edge will be.
- The crown molding must now be measured, cut, painted (optional), and installed. Apply enough adhesive to the molding or wall after proceeding as you did while making the template. In order to finish the room, press another molding into position, hold it there for a moment, and then repeat the operation. To support the crown molding, insert some mechanical fasteners. Finish the seams at the top and bottom with an excellent all-purpose adhesive caulk. Discard any excess and allow everything to dry.
If you don’t have the expertise in doing the installation the Mr. Handyman team is just a phone call away and can be rapidly deployed to your apartment or house around Palm Beach Gardens, Florida. Contact us today to get a free installation quotation.
CABINET CROWN MOLDING INSTALLATION DIRECTIONS
The ideal crown molding is the finishing touch on any cabinet which can help spruce up your Palm Beach Gardens home. To put crown molding on kitchen cabinets is follow these precise steps:
- Making a template will help you ensure that the parts will fit on your cabinet and that the angles have been cut accurately. You might want to transmit measurements directly from the cabinet because doing so identifies the precise location of the cutting.
- To ensure the miter joints are the right angle for your cabinet, cut the molding using a miter saw.
- Before attaching your molding pieces to the cabinet, position them there and make sure they fit correctly by holding them in place with masking tape.
- Using a strong adhesive, attach the first component to your cabinet before doing the same with the following piece. Up until all the components are cemented in place, repeat this process. Mechanical fasteners are also necessary on larger projects to hold everything in place.
HOW TO REPAIR DAMAGED CROWN MOLDING
At Mr. Handyman we offer the best quality services when it comes to crown molding installation within Palm Beach County. However, if you choose the DIY route you can follow these described four procedures listed below, to fix cracks, dents, and gaps between individual pieces of crown molding with the appropriate tools and techniques.
- Use a high-quality All-Purpose Adhesive Caulk that you can buy to fill in the spaces between your crown molding and ceiling. Spread the substance over the opening and smooth it out. Eliminate any extra, allow it to dry, and then paint the molding.
- Using a gap-filling adhesive, repair cracks or spaces between the crown molding's parts. After removing any extra, let the fabric dry. Apply the proper spackle over the material you have applied if necessary. After leveling the surface with sandpaper, paint over your alterations.
- Take into account, painting your crown molding if it is tarnished and has several faults. Crown molding flaws can be more effectively concealed by paint than by glossy surfaces.
- If your crown molding is severely damaged or was cut too short, replacing the molding can be the best option.Crown Moldings Palm Beach Gardens: Fixing and Installing
