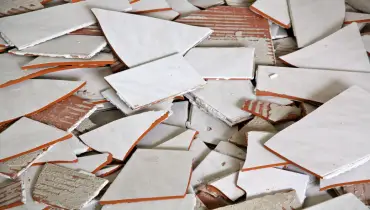
Picture this: You’ve just finished renovating and your pride and joy is your brand-new, pristine ceramic tile flooring. It’s something you’ve wanted for years and you finally made the decision to switch from carpet to tiling. You couldn’t be happier.
Then, as you’re enjoying your morning coffee and admiring your new floors, the doorbell rings. Your dog rushes past, barking at the person outside. In the flurry of activity, your dog knocks over a brass lamp and it lands on your brand-new tile. Which chips?
We understand that sinking feeling when the home you’ve invested time and love into becomes damaged. That’s why we put together this guide including everything you need to know about tile repair.
Should your floors, backsplash, or shower tile be damaged, here’s what to do.
What Causes Damaged Tiles?
Aside from chips caused by heavy items falling onto or hitting against the tile, there are other causes of damaged tile. Including:
- Dents turning into cracks. Perhaps you dropped a cast-iron pan in your kitchen or a curling iron in your bathroom. What was at first a small dent you thought nothing about has now progressed into a crack.
- Cracking beneath the tile. Just because your tile has cracked does not necessarily mean there is a problem with the tile itself. There are many layers making up your flooring, including a layer of concrete. Concrete tends to crack, so contractors use control joints to ensure it cracks in a straight line. If your tile was laid over one of these control joints — which it shouldn’t have been — the tile may also crack.
- Improperly installed joists. A joist is the bottom-most layer of your flooring that supports everything that goes on top of it. If these joists were built too far apart, the tile on the topmost layer of your floor will have nothing underneath it to support the weight of people, furniture, and pets. This will cause the tiles to bend and eventually crack.
If you don’t know the cause of your damaged tile, then be sure to call the experts at Mr. Handyman. Our professional and thorough team of skilled McKinney technicians possess an average of 10 years of experience in the trades. We have the know-how to install or repair tiles correctly and efficiently.
Why is it Important to Repair Tiles as Soon as Possible?
Broken, chipped, or cracked tiles are not only unattractive to look at, but they also pose a safety hazard. For instance, a child running around in their bare feet or a beloved pet may get hurt if they step on a damaged tile.
Also, while tiles are waterproof, when they crack water can seep through those gaps and cause damage to your subflooring. This damage can be time-consuming and costly to repair. The best practice is to replace or repair tiles that are damaged as soon as possible.
How Do You Know When to Replace or Repair Tiles?
While fixing damaged tile as soon as possible is key for the well-being and safety of your home, there are a few considerations for knowing when to repair tile or replace it entirely:
- How bad is the damage? Is there one tiny chip in the corner of your tile, a crack running along the entire square, or damage to multiple tiles? While a small chip may be fast and easy to repair, the larger the crack and the more widespread the damage may mean you need to replace the tiles completely.
- Do you have spare tiles from when the tiles were originally installed? A good practice is to keep spare tiles that match your flooring or backsplash somewhere safe. The tone and color of tiles — even from the same make and design — fluctuate depending on what batch they were from. If you're planning a home renovation or moving into a new home with tile floors, ask your contractor or the previous homeowner if they have spare tiles. Then, if you need to replace a tile down the line the process will be easier.
- How comfortable are you with DIY tasks? Repairing tile requires the correct tools, materials, and time to correctly fix any damage. Not to mention, you only get one chance to correctly repair a broken tile. Likewise, replacing tile is laborious and requires a degree of experience to be done correctly. Perhaps you are confidently DIYing around your home, or maybe you’d prefer to let the experts at Mr. Handyman handle your tile repair needs.
Different Types of Tile
Our team is experienced in installing and repairing a variety of different types of tile. Each type has its own considerations when it comes to tile repair and replacement.
- Laminate: Laminate tile flooring is a layer of a synthetic product that uses a photographic applique layer to look similar to wood or stone. This material is both durable and water-resistant. If laminate flooring chips, either the entire plank will need to be replaced or the chip (if small enough) can be filled with laminate patching material.
- Ceramic: Ceramic tile is one of the most common types of tile found in kitchens, bathrooms, and flooring. The reason for this is that it's a very durable material, is straightforward to install, and is easy to clean. Ceramic tiles also come in a variety of sizes, colors, and patterns.
- Slate: Slate tiling is one of the most attractive and durable kinds of natural stone tiling. However, while this material will add real estate value to your home, it does require regular sealing to prevent staining. Also, repairing or replacing slate tiles can be tricky because the material is very heavy. Replacing slate tiles is a project best left to the professionals.
- Cork: There's been a recent rise in popularity when it comes to cork tiling. Cork is a natural, renewable resource that adds a pleasant aesthetic to a room. However, cork scratches easily and requires consistent upkeep.
- Porcelain: Porcelain tile is a kind of ceramic tile, but also different. While ceramic tile is already very durable, porcelain is known for being even stronger. Porcelain tiles also come in a variety of patterns, shapes, and colors. Yet, installing porcelain on your own can be a difficult process because of how dense this material is.
- Marble: Marble tile is a truly elegant material. However, marble is also very heavy and requires specific tools for cutting and drilling into it. For this reason, replacing damaged marble can require professional skills.
The Difference Between Sanded and Unsanded Grout
Sanded and unsanded grout are two of the most common types of grout. Each variety has its own specific uses, benefits, and disadvantages. To help you understand the differences between sanded and unsanded grout, we’ve laid out a pros and cons list.
Sanded Grout Pros
- Sanded variations of grout are thicker than unsanded variations of grout. Due to the fine sand mixed in, the mixture will not shrink and pull away from the tiles as it dries. However, because of its thickness, it needs to be applied to tiles that are spaced out more than 1/8 of an inch apart.
- Sanded grout is more durable than unsanded grout. Sanded grout is ideal for areas in your home with heavy foot traffic, such as the bathroom or kitchen floor, because it's less likely to crack under pressure.
Sanded Grout Cons
- Sanded grout may scratch smooth tiles. Sanded grout is somewhat like sandpaper. You wouldn’t sand a marble, granite, or limestone tile with sandpaper, so it’s important to know what would scratch and if it is a problem. It would be a shame to damage your natural stone tiling.
- Sand-mixed grout is too thick for narrow spaces. Applying grout to spaces that are smaller than 1/8 of an inch is difficult because the mixture is too thick for precision work.
Unsanded Grout Pros
- Unsanded grout holds better on vertical surfaces. Since grout without sand is stickier than grout with sand, it works better for applying tiles on a backsplash or bathroom wall. Also, even though unsanded versions shrink, this is less of an issue on a wall as opposed to a floor because wall tiles are generally placed closer together.
- Unsanded grout is easier to work with than sanded. Another benefit of using unsanded versions of grout is that it's easier to apply an even layer before placing your tiles.
Unsanded Grout Cons
- Unsanded versions of grout have fewer color options than sanded grout. While not a deal breaker, depending on your design goals you may want a color that is not available.
How To - Tile Repair
If you are comfortable DIYing within your home, you may want to repair a chipped or slightly cracked tile yourself. If you’re not confident repairing a damaged tile alone, we suggest contacting our expert crew at Mr. Handyman to ensure your broken tile looks good as new.
How to repair tile:
- Clean up the area. Using tile cleaner, dish soap, or bleach, ensure the damaged tile and surrounding grout is cleaned thoroughly. Let it dry completely before proceeding to the next step.
- Mix your epoxy. Choose clear or white epoxy and mix according to the manufacturer’s instructions.
- Avoid the grout. Take care not to get epoxy on the grout surrounding the chipped or cracked tile.
- Apply the epoxy. Using a toothpick or craft stick, apply epoxy to the chip in thin layers over a period of 30 minutes.
- Paint the epoxy. With paint that matches your tile, use a small brush to apply two coats of paint over the epoxy.
- Let the paint cure. Depending on your paint, this process could take a few hours or a few days.
- Seal with urethane. Using a water-based urethane, cover the paint patch with three coats and let dry completely.
Only One shot
As you decide whether to repair the blemished tiles yourself or to call in the pros, bear in mind that you will only have one chance to properly fix the chip or crack. We recommend practicing with the spare tile you may have lying around the house to get a feel for tile repair.
How To - Tile Replacement
Replacing a damaged tile or section of tiles has a few more steps than repairing a chip. It requires patience, the proper tools, and — if possible — spares of the original tile. The team at Mr. Handyman is always ready to provide expert tile repair and replacement in a professional and efficient manner. However, for the DIY’er in you, read the following tile replacement tips.
Be Proactive
If you can, save extra pieces of tile when first installing your new flooring. Or, if you move into a new house ask the previous homeowner or contractor if they have excess tiles they could give you. Since even the same kind of tile from a different batch could look different, this approach will help you seamlessly swap out the damaged tile for an identical one.
How to Replace Damaged Tiles:
- Clean the area. Using bleach, tile cleaner, or dish soap, carefully clean the damaged area.
- Remove the grout. Put on safety goggles and use a grout saw to remove the grout.
- Apply painter’s tape. Frame the damaged tile with painter’s tape to protect the surrounding tiles.
- Loosen the tile. Drill four holes into the broken tile. This will loosen it and make it easier to chisel out the pieces.
- Chisel out the pieces. Use a hammer and either a tile chisel or a cold chisel and work your way from the center out to remove the tile pieces.
- Clean out the old adhesive. Use a chisel to remove any old adhesive to make a smooth surface for the new adhesive.
- Apply thin-set mortar. With a trowel, apply the adhesive to both the newly cleaned surface and the back of the new tile.
- Place the new tile. Gently place the new tile into position. Ensure the spacing is even on all sides.
- Let the new tile cure. Wait at least two hours for the new tile to set, then mix up your grout.
- Apply the grout. Swipe the grout using a rubber float at a 45-degree angle into the cracks around the new tile.
- Wipe away excess grout. Once the grout no longer feels tacky, wipe away any excess using a damp sponge.
- Let the grout dry. Do not apply any pressure to the new tile, such as walking on it, for 24 hours.
Replace Old Grout
Sometimes your tile may still be in tip-top shape, but the grout surrounding it has started to crack, fade, is moldy, or is no longer your style. Give your tiles a new lease on life by replacing the old grout. Replacing old grout is not difficult, but it is a time-consuming task. If you’d rather save that time, reach out to Mr. Handyman of Midwest Collin County. We’re more than happy to make replacing your old grout in your hands.
How to replace old grout:
- Remove the old grout. Wearing safety goggles, use an oscillating tool fitted with a grout blade to remove as much of the old grout as you can.
- Remove remaining grout. Take a flathead screwdriver or utility knife to manually remove any grout the power tool missed.
- Clean as you go. Use a shop vacuum to clean up the old grout as it is scraped away.
- Apply new grout. Mix and apply your grout using a rubber float tool, holding it at a 45-degree angle.
- Wipe away excess. Once your grout is no longer tacky, use a damp sponge to wipe away any excess.
Don’t Want to Repair Your Tile Alone? Call the Pros!
Perhaps now you feel confident to tackle your DIY tile repair — which is fantastic! Or maybe you’re leaning toward calling the experts. Should that be the case, the skillful team at Mr. Handyman is prepared to help you with any tile repair, replacement, or installation problem you may have.
Whether the shower in your bathroom needs new tiling, your kitchen backsplash requires a facelift or you’re installing new tile floors, get in touch with us today to request professional Midwest Collin County handyman service.
