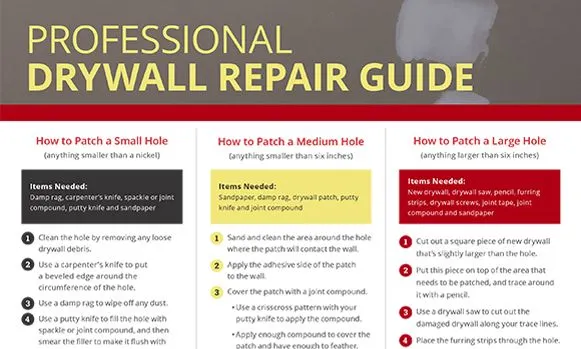
 Drywall repair is a common home maintenance task that many homeowners can do themselves. The skill set, tools and techniques required for drywall repair depend on the size of the hole. If you can flip a fried egg, you can easily patch a small nick in your drywall, but it gets trickier as the holes get bigger. But don’t worry; Mr. Handyman is here to help! Download our Drywall Repair Guide for step-by-step instructions.
Drywall Repair Techniques
The size of the hole will determine what method of repair you’ll use. You may not need all of these tools – before you purchase anything, reference the guidelines below to see what you’ll need. You’ll find the required materials listed with each step. Drywall tape is available in paper or mesh, select mesh if you have a choice. The tools in bold are required for each step, regardless of hole size.
Tools & Materials for Drywall Repair
- Putty knife
- 120-grit sandpaper
- Carpenter’s knife
- Drywall saw
- Broad knife
- Trowel
- Dust mask
- Drill
- Drywall patch kit
- Pre-mixed joint compound
- Drywall tape
- Drywall screws
- Furring strips
- Spackle
How to Patch a Small Hole (Anything Smaller Than a Nickel)
Small holes in drywall are simple to fix. Any hole larger than a nickel should be repaired with the instructions under Medium or Large hole. Use spackle or joint compound to fill the hole. If you’re using joint compound, buy it pre-mixed for small DIY jobs. Spackle may shrink as it dries in larger holes and may require an extra application. Joint compound may run out or bulge as it sets and will require sanding and a second application.
Materials: For this job you’ll need joint compound or spackle.
- Clean the hole by removing any loose drywall debris.
- Use a carpenter’s knife to put a beveled edge around the circumference of the hole if it’s larger than a dime.
- Use a damp rag to wipe off any dust.
- Use a putty knife to fill the hole with spackle or joint compound, and then smear the filler to make it flush with the wall.
- Allow the filler to air-dry.
- Lightly sand the area with sandpaper and apply a second coat. Sand once dry.
- Prime and paint over the filled hole.
How to Patch a Medium Hole (Anything Smaller Than Six Inches)
For a professional finish follow the instructions under Large hole. This method requires finesse to feather the joint compound into the rest of the wall – if not done correctly, you will see a slight bulge in the wall. You must feather the repair area (gradually reduce the thickness outward) when applying the joint compound and in the sanding stage. Use a drywall patch that is slightly larger than the hole that needs to be repaired. You can purchase these at your local hardware store. Look for a kit, which will include everything you need.
Materials: For this job you’ll need a drywall patch and joint compound.
- Sand and clean the area around the hole where the patch will contact the wall.
- Apply the adhesive side of the patch to the wall.
- Cover the patch with a joint compound.
- Use a crisscross pattern with your putty knife to apply the compound.
- Apply enough compound to cover the patch and have enough to feather.
- Once dry, lightly sand and apply another coat.
- Sand the dry second coat with sandpaper.
- Feather the edges to blend the repair into the wall.
- Prime and paint.
How to Patch a Large Hole (Anything Larger Than Six Inches)
Take your time, and be careful not to nick any wires or plumbing during installation. Although this method requires more tools, the final result is more professional looking.
Materials: For this job you’ll need a scrap piece of drywall, furring strips, joint tape, drywall screws, and joint compound.
- Cut out a square piece of new drywall that’s slightly larger than the hole.
- Put this piece on top of the area that needs to be patched, and trace around it with a pencil.
- Use a drywall saw to cut out the damaged drywall along your trace lines.
- Place the furring strips through the hole. Pull them tight against the backside of the drywall and anchor them from the front with drywall screws.
- Make sure the screws firmly anchor the furring strips to the back of the drywall. The screw heads should be flush or slightly dimpled.
- Set the new drywall patch in place, and secure it to the furring strips with drywall screws.
- Hold everything together by bedding in drywall tape with joint compound along the edges.
- Cover everything with drywall joint compound.
- Lightly sand once dry and apply a second coat.
- Sand the second coat once it dries.
- Prime and paint.
Tips
- Apply a third layer of joint compound for a smoother look after the second layer has been sanded.
- For patches, spread the joint compound over an area much wider than the patch so you have material to feather.
- Wear a dust mask while sanding joint compound, or have someone capture dust with a vacuum.
- If you’re repairing textured drywall, use a can of wall texture spray before you paint.
- In a pinch, use a heavy-duty paint stirring stick in place of a furring strip.
- Never skip the priming step – joint compound cannot be painted on top of. Some spackles may have primer already in them. These are best for small holes only.
Professional Drywall Repair
Drywall repair is pretty straightforward. If you’re up for the challenge and have the right tools, it can be a satisfying DIY repair. However, if you don’t have the tools, if the hole requires new drywall replacement, or if the entire drywall sheet needs to be replaced, hiring a professional is the next best option.
Need some help? Mr. Handyman's drywall repair professionals can patch the holes in your wall or replace entire sheets of drywall if needed. The results are seamless and beautiful. Drywall repair, drywall hanging and drywall finishing – we do it all! Contact your local Mr. Handyman to discuss your project today.
 Click to call


